When working with developers fairly new to git, I frequently find them in a state of confusion about where their feature branch is relative to the master branch (or whatever they are merging into). That’s definitely understandable, as normally it’s not that easy to tell from the command line. If you’ve run into this problem before, then read on; I’m going to explain a couple different techniques to understanding what changed between two branches.
I want to go over three commands here - git diff, git log, and gitk. You may or may not have used these before, but there are many command line switches for each of them, so I will go over a few that are the most useful to me day-to-day.
Use a diff
If you know you don’t have too many changes from your source branch, you can do a diff of the branches, and see what exactly has changed.
1 | |
Of course, this quickly gets out of hand when you have many files changed. You can get a higher level overview of the diff by getting statistics instead:
1 | |
This shows how many adds, deletes, and edits there are per file between the two branches. However, there’s a big downside here - if you’re on a feature branch and both the master branch and your branch have more commits on them, then it’s hard to tell what changes are yours and what changes are from the master branch. This is especially problematic if you’re on a team and the master branch has many changes since you forked off your feature.
There is one way to get around this for the diff command, but it’s a bit awkward. You can find what’s called the ‘merge base’ of your two branches - which is the point at which your feature and the master branch diverged. Once you have that, you can diff with that commit so that you don't see any of the changes to master that have happened since you forked. There is actually a command for to find the merge base, aptly called merge-base:
1 2 | |
You can use the output of this command in any other command that takes a commit hash - and git diff is one of them.
1 | |
Now this only shows the diff between the point where you branched from master, and the current commit. Even with this trick, however, it can get difficult to understand why the changes were made - so you might want to see the actual commits that have diverged from master.
Use the Log
The main way that you see a list of commits over time with git is by using the git log command. This is going to be useful in showing us the differences between the two branches. However, because git log by default shows you the entire history of your branch (including commits other branches have), you will need to use a couple command line switches to get it to show the information you want.
Log Range
If you have a topic branch and want to see how many commits you’ve made on top of the main branch, you can do a range query using git log.
1 2 3 | |
What this command says is to show the list of commits on your branch, starting at the commit master is pointing to, and going up to the commit you are currently on. With this command, Git will automatically find the merge base between the two branches and list all the commits since that point. Similarly, you can see all the commits that have happened on the other branch since your feature started by reversing the order of the commits in the range:
1 2 | |
This is great, but once again, starts to break down when there are many changes between branches. At some point, the command line starts to make it difficult to see the big picture, and a GUI tool is going to help more.
Fortunately, git is bundled with just such a tool - it’s called “gitk”.
See a Graphical View with Gitk
Gitk is a GUI tool for viewing git repositories as a graph of commits. There are a few command line switches that let you see more or less information, and lots of settings so you can configure to your heart’s desire. This is my favorite tool for doing some deep spelunking in a repository to figure out what’s going on. Here's a screenshot of the lumify open source project:

You start up the tool by simply running “gitk” at the command line. What you get is a graphical window showing all the commits starting with your current branch and going backward. Note that “up” is forward in time, so the top commit is your current location. You can see the graph of commits at the top, the list of changed files in a particular commit on the bottom right, and the diff of that commit, by file, on the bottom left.
I like to use this window to look at the graph of commits - you can click on any of them to pull up the diff for that commit and inspect the changes. You can clearly see how many commits one branch diverges from another, and if you use the command gitk —all, it will show you all local branches in the same view so you can see how all of them relate to each other.
You can even make changes to the git repository straight from this window! Try right-clicking on one of the commits and see the context menu of actions.
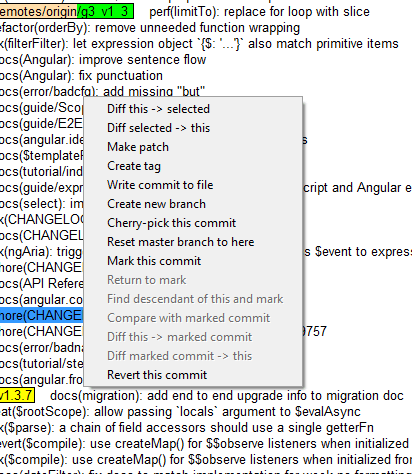
Sometimes I create temporary branches from a commit that I want to reference from an IDE or some other tool - and I do it simply by right clicking the commit and clicking “create branch”. From that context menu, you can also get a diff between two commits or branches if you prefer not to use the command line.
So there you have it - a few useful commands and a tool for visualizing a git repository. When teaching people to use git - I make sure to emphasize the command line first, as it’s really important to master early on. However, once you know how things are working - GUI tools can be great - and gitk is an especially useful one.